Showing posts with label Tutorial. Show all posts

Friday, May 30, 2014

StreetView in Android

As part of the 4.4 Play Store Services release Google has extended the Maps API to include Native StreetView. I’m super excited about this, in fact I would go so far as to say that if your app has a map it needs StreetView! I know that’s a big claim and the reason I make this claim is that while a map is great at showing a user where a landmark is and how to get from one point to another, it does a very bad job of showing you what to expect when you get there. This, of course, is where StreetView excels!  Providing users access to StreetView as part of your maps solution not only gives your users the ability to see what the landmark looks like before they get there, but also what landmarks surround it, what type of road it’s on, whether or not it has curb side parking available, etc, etc. The best part about it is that StreetView can be embedded inside your app with very little effort.

So let us begin! In this tutorial we’ll  be using the SupportStreetViewPanoramaFragment to create a self contained fragment that takes a set of longitude and latitude coordinates, positions you at the street near your coordinates, and points you in the direction of your coordinates.

Setup

As with all my tutorials I’m going to assume you’re using Android Studio, or at least using the Gradle build system. The first step is to setup Google Play Services Maps, now I could take you through each step but Google already has done this better than I could have. You can find Googles setup page here

You’re back, great, now open up the Android SDK manager and ensure you have the latest version of Play Service and ensure you have added the latest version as a dependency and we’re ready to begin!


Implementation

The first thing we’ll do is create a new SupportFragment called StreetViewFragment that extends the SupportStreetViewPanoramaFragment, this will allow us to keep all custom StreetView logic inside our fragment class. While we’re at it we’ll create a newInstance method that take a set of latitude and longitude coordinates and returns a new instance of the StreetViewFragment.


The newInstance methods is fairly simple, it stores the geo coordinates in the fragment arguments for use later, and returns a new StreetViewFragment instance.

The next step is to override the onCreateView so we can start to setup and position the StreetView camera.


Just a quick note on positioning the StreetView panorama, while this might be obvious the position of your panorama will not be the location you pass in but the closes road side position. What’s not obvious is that the panorama will not point towards your target location, but instead will point to 0 degrees or North. So while the code thus far will position the panorama correctly it will more than likely be pointing the wrong way. In order to fix that we’ll first create a helper method that will tell us the angle between two locations.


Before we can use the above method we need to get the camera location, unfortunately the camera location is not set until after the onCreateView method as been called. Luckily for us we can get the camera location by listening to the onStreetViewPanoramaChange event onCreateView. Just remember to remove the listener unless you want StreetView to point towards your coordinates every time the user moves the camera.

Wednesday, January 29, 2014

Listening to bluetooth connections


In this quick tutorial I'm going to lead you through creating a BroadcastReceiver that will listening for bluetooth device connections and disconnections.


Permissions

The first though we'll do is add a few permissions in the AndroidManifest, we need both the Bluetooth and the Bluetooth Admin permission for listening to connections/disconnections.


BroadcastReceiver

The next step is to create a BroadcastReceiver that receives ACL_CONNECTED and ACL_DISCONNECTED broadcast actions.


Registration

The last step is to register the BroadcastReceiver in the AndroidManifest so it can start receiving the broadcasts automatically. Alternatively you can handle this by registering the receiver in an Activity or Fragment when needed.


Tuesday, August 10, 2010

Development Tip: Widget Updates

After battling with a complex widget design for the past couple of weeks, I've made a hard found observation. You must set all non-static widget fields on each update, even if the values haven't changed since the last update.

The reasoning behind this is if the widget is dropped out of memory and reloaded, it will display only the most recent update. Meaning any data from previous updates will be forgotten, leaving the widget with a partial update.

Doesn't sound very efficient to me!

Thursday, June 24, 2010

Tutorial - Determinate Horizontal Progressbar Theming

Sometimes it makes sense for Android apps to use horizontal progressbars to display quantitative data. The problem in using progressbars for this is that the colour is linked to the current theme of the ROM you are using. In generic Android this is a ghastly yellow and in the Desire ROM it is an even worse green colour. While it's not too bad if the progressbar is just being used as a progress bar, it isn't exactly desirable when using it to show data in your app. The good news is that you can manually theme the progressbar to suit your app and make it consistent between different ROMs.

This tutorial is relatively simple but it does assume you have a working Eclipse environment setup for Android development.

As we will be skinning a determinate horizontal progress bar, as apposed to the circular animated progress bar, ensure that the style of your progress bar is set as follows:
?android:attr/progressBarStyleHorizontal

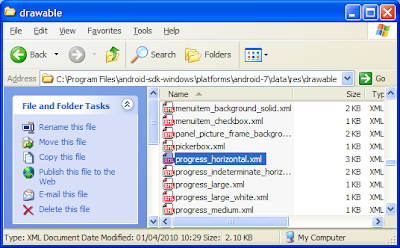
When the Android OS displays a view it uses a default xml drawable file to determine what colours should be used when displaying. As we don't want to start skinning the bar from scratch, we'll take the default file and copy it into our projects drawable folder. The file we will need is found at:
<AndroidSDK Root Directory>\platforms\android-<version>\data\res\drawable


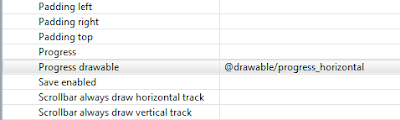
Now that we have our own copy of the progressbar's drawable file we want to set the progress drawable attribute of our progress bar to point to it. To do this select the target progressbar and scroll down to Progress Drawable in properties. In the values section type
@drawable/progress_horizontal, alternatively you can use the ... button in the Progress Drawable value field and browse for it.


Now that we have our progressbar pointing to our own drawable we can start to modify the XML. Open up the drawable XML file in Eclipse and you will see that it contains three main sections/ You can safetly ignore the background section as we are only interested in the secondaryProgress and progress sections.

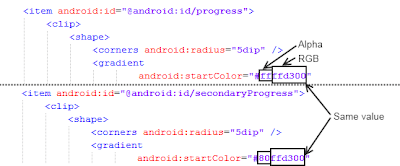
You'll notice that each of these sections contains three colour values for creating gradients, startColor, centerColor and endColor. Each of these colour values are broken up into two parts, a two digit alpha value and a six digit RGB value.


An important thing to note is that the only difference between the startColor, centerColor and endColor of the progress section and the startColor, centerColor and endColor of the secondaryProgress section is the alpha values. This means that when we modify the RGB value of one value we must also copy it across to the corresponding value in the other section. Be careful not to accidentally copy over the alpha portion, it will throw off the 3D effect.

To begin customizing the theme we must first pick the desired colour. Fire up your favorite photo editing program and pick your desired colour on the colour picker. Now copy the corresponding RGB values into the CenterColor fields in both sections. Remember not to copy over the alpha values.

Next we want to lighten the colour a couple of shades and copy the RGB values into both endColor fields. Lighten the colour again, but this time copy the RGB values into the startColor fields. By using three different shades we are able to keep a consistent 3D look like that of the original progressbar.


There you have it, a custom themed progressbar. You may need to tweak the shading differences a few times to get the best results.